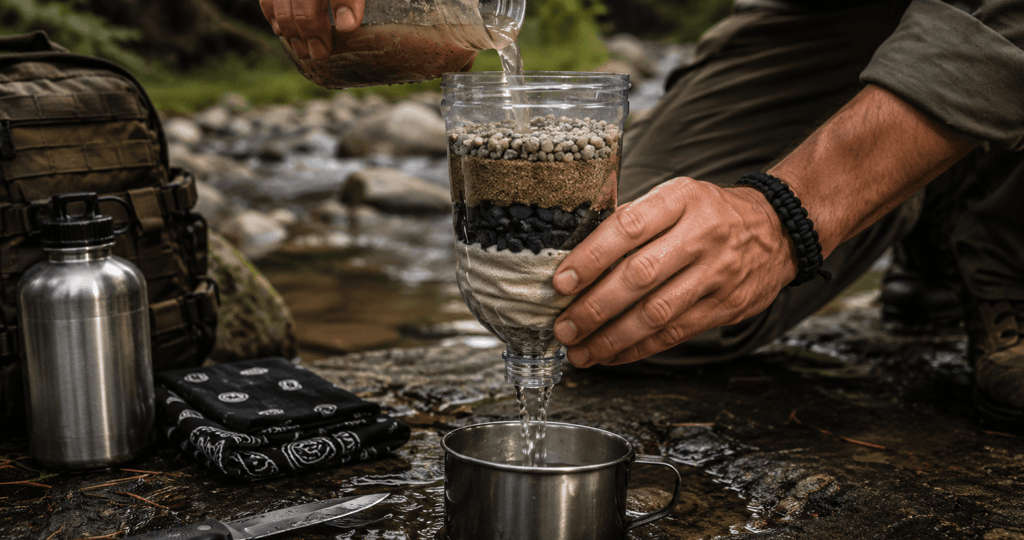
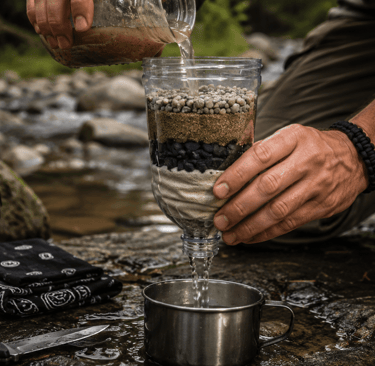
How to Build an Improvised Water Filter in a Survival Situation (Step-by-Step Survival Guide)

Learn how to build an improvised water filter in a survival situation using simple materials like sand, charcoal, and gravel. This step-by-step guide shows how to turn dirty water into safer drinking water during emergencies.

SURVIVAL SKILLS

Global Survivalist Team

3/5/20266 min read

Water is the single most important resource in any survival situation. Humans can survive weeks without food, but only about three days without water. In emergencies such as natural disasters, wilderness survival scenarios, or infrastructure collapse, access to clean drinking water can quickly disappear.

Rivers, lakes, and even rainwater may look clean, but they often contain bacteria, parasites, sediment, and harmful microorganisms that can cause severe illness. Drinking untreated water can lead to diseases such as giardia, dysentery, and cholera.

Fortunately, even without modern equipment, it is possible to build an improvised water filter using simple materials found in nature or common household items. While these filters are not perfect replacements for professional purification systems, they can significantly improve water quality and increase your chances of survival.

This guide will walk you through how to build a survival water filter step-by-step, explain the science behind filtration, and show you multiple methods depending on what materials you have available.

Why Water Filtration Is Critical in Survival Situations

Before building a survival filter, it's important to understand why filtering water matters.

Contaminated water may contain several dangerous elements:

1. Sediment and Debris

Mud, sand, leaves, and organic matter often contaminate natural water sources.

2. Bacteria

Examples include:

  • E. coli

  • Salmonella

  • Campylobacter

These can cause severe gastrointestinal illness.

3. Parasites

Parasites such as Giardia and Cryptosporidium are commonly found in untreated water.

4. Chemical Contamination

In urban disasters, water may contain:

  • fuel

  • pesticides

  • industrial runoff

5. Viruses

Though less common in wilderness water sources, viruses may be present in contaminated environments.

A properly built improvised filter can remove many physical contaminants, but it should ideally be combined with boiling or chemical purification for maximum safety.

Materials You Can Use to Build an Improvised Water Filter

One of the advantages of survival filtration is that it can be built using very basic materials.

Common items include:

Natural Materials

  • Sand

  • Gravel

  • Small stones

  • Charcoal from a fire

  • Grass

  • Cloth

  • Moss

Household Items

  • Plastic bottle

  • Coffee filter

  • T-shirt fabric

  • Bandana

  • Socks

  • Bucket

  • Container

Tools (Optional)

  • Knife

  • Scissors

  • Fire source

The goal is to create multiple filtration layers that remove progressively smaller particles.

The Science Behind a Survival Water Filter

Understanding how filtration works helps you build a more effective filter.

Improvised filters rely on three primary filtration processes:

1. Mechanical Filtration

Layers of gravel and sand physically trap dirt and particles.

2. Absorption

Charcoal absorbs chemicals, toxins, and odors.

3. Sedimentation

Slower water flow allows heavy particles to settle.

Combining these methods creates a multi-layer survival filter, which is far more effective than a single material filter.

Method 1: The Plastic Bottle Survival Water Filter

This is one of the most effective improvised survival filters because it allows you to build multiple filtration layers.

Materials Needed

  • Plastic bottle

  • Charcoal

  • Sand

  • Gravel

  • Cloth or coffee filter

  • Knife or scissors

  • Container for filtered water

Step 1: Prepare the Bottle

Cut the bottom off the plastic bottle.

Turn the bottle upside down so the cap points downward.

Remove the cap.

You now have a funnel-shaped filter housing.

Step 2: Add the Cloth Layer

Place a cloth, bandana, or coffee filter in the bottle neck.

This layer prevents fine materials from escaping.

It also provides the final filtration stage.

Step 3: Add Charcoal

Crush charcoal from a fire into small pieces.

Add a layer about 2–3 inches thick.

Charcoal is extremely important because it:

  • removes odor

  • absorbs chemicals

  • improves taste

This step significantly improves water quality.

Step 4: Add Sand

Add a layer of fine sand above the charcoal.

The sand captures small particles that pass through gravel layers.

Depth recommendation:

2–3 inches.

Step 5: Add Gravel or Small Stones

Add a top layer of gravel.

This layer:

  • blocks large debris

  • prevents sand from shifting

  • distributes water evenly

Step 6: Pour Water Slowly

Pour dirty water slowly into the filter.

Water will pass through:

  1. Gravel

  2. Sand

  3. Charcoal

  4. Cloth

Then it will drip into your clean container.

Step 7: Repeat Filtration

For better results, filter the water multiple times.

Each pass improves clarity and removes more particles.

Method 2: Survival Water Filter Using Natural Materials

If you are stranded in the wilderness without containers, you can build a natural filtration system using the ground.

Step 1: Dig a Filtration Hole

Dig a hole about 1–2 feet deep near a water source.

This hole will fill with groundwater filtered through soil.

Step 2: Allow Water to Seep In

Over time, water will seep through the surrounding soil into the hole.

The earth naturally filters out:

  • sediment

  • debris

  • some bacteria

Step 3: Collect the Water

Carefully scoop the clearer water from the hole.

Although cleaner than the original source, it should still be boiled if possible.

Method 3: Charcoal Stick Filter

If you have minimal materials but access to fire, charcoal alone can help.

Step 1: Create Charcoal

Burn hardwood in a fire until it becomes charcoal.

Allow it to cool.

Step 2: Crush the Charcoal

Break it into small granules.

Avoid powder.

Step 3: Wrap in Cloth

Place charcoal in cloth and tie it into a pouch.

Step 4: Pour Water Through It

Slowly pour water through the charcoal pouch.

This method removes:

  • odors

  • some toxins

  • small particles

However, it is less effective than multi-layer filtration.

Method 4: Multi-Container Gravity Filter

If you have buckets or containers, you can build a larger survival filtration system.

Step 1: Stack Containers

Use two containers:

Top container β†’ filtration materials
Bottom container β†’ clean water

Step 2: Drill or Punch Holes

Create small holes in the bottom of the top container.

Step 3: Add Filtration Layers

From bottom to top:

Cloth
Charcoal
Sand
Gravel

Step 4: Pour Water Into Top Container

Water slowly passes through layers and drips into the lower container.

Gravity does the work.

Important Step: Always Purify Filtered Water

Improvised filters remove many contaminants but not all pathogens.

After filtering, you should purify the water.

Method 1: Boiling

Boiling is the most reliable survival method.

Steps:

  1. Bring water to a rolling boil.

  2. Boil for at least 1 minute.

  3. At high altitude, boil 3 minutes.

This kills most bacteria, viruses, and parasites.

Method 2: Solar Disinfection (SODIS)

If boiling isn't possible:

  1. Fill a clear plastic bottle.

  2. Place in direct sunlight.

  3. Leave for 6 hours.

UV radiation helps destroy microorganisms.

Method 3: Chemical Treatment

Emergency chemicals include:

  • iodine tablets

  • chlorine tablets

  • household bleach (very small amounts)

These kill microorganisms effectively.

Tips to Improve Your Improvised Water Filter

To maximize the effectiveness of your filter:

Use Multiple Layers

More layers = better filtration.

Filter Slowly

Slow filtration improves particle removal.

Replace Materials Regularly

Dirty filters become ineffective.

Use the Cleanest Source Possible

Choose flowing water instead of stagnant pools.

Avoid Chemical Contamination

Improvised filters cannot remove heavy metals or industrial chemicals effectively.

Best Natural Water Sources in Survival Situations

If you must find water, look for these sources:

Flowing Streams

Moving water is usually cleaner.

Rainwater

One of the safest natural sources.

Morning Dew

Can be collected using cloth.

Melted Snow

Must always be boiled.

Plant Transpiration

Plastic bags tied to plants collect moisture.

Signs That Water Is Unsafe

Avoid water that has:

  • strong chemical smell

  • oily film on the surface

  • bright unnatural colors

  • dead animals nearby

These signs may indicate chemical contamination.

Improvised filters cannot remove many industrial toxins.

Common Mistakes When Building a Survival Water Filter

Many beginners make mistakes that reduce filtration effectiveness.

Using Only One Material

A single layer (like sand alone) is not effective.

Always combine materials.

Filtering Too Quickly

Pouring water too fast reduces filtration time.

Slow flow improves purification.

Skipping the Boiling Step

Even clear water may contain dangerous microbes.

Always purify if possible.

Using Dirty Containers

Clean containers are essential to avoid re-contamination.

How Long an Improvised Filter Lasts

Improvised filters are temporary.

They typically last:

  • several hours

  • one or two days

After extended use, materials become clogged.

You must replace sand and charcoal regularly.

Why Every Survival Kit Should Include a Water Filter

Although improvised filters are helpful, it is always better to carry professional water purification tools.

Recommended survival gear:

  • portable water filters

  • purification tablets

  • metal container for boiling

  • collapsible water bottles

These items dramatically increase survival odds.

Final Thoughts

Knowing how to build an improvised water filter in a survival situation is one of the most valuable preparedness skills you can learn. Whether you are facing a wilderness emergency, a natural disaster, or infrastructure failure, access to safe drinking water will determine your ability to survive.

By using simple materials such as sand, gravel, charcoal, and cloth, you can create an effective multi-layer filtration system that removes many contaminants and improves water clarity. When combined with boiling or chemical purification, this method can transform unsafe water into a life-saving resource.

Preparedness is about knowledge as much as equipment. The more survival skills you master today, the more resilient you will be when emergencies occur.

Clean water is survival β€” and knowing how to create it from almost nothing could save your life.

Frequently Asked Questions

Can you drink water from an improvised water filter?

Improvised water filters can remove sediment and debris, but they may not eliminate all bacteria and viruses. For maximum safety, filtered water should always be boiled or chemically treated before drinking.

What materials work best for a survival water filter?

The most effective materials include charcoal, sand, gravel, and cloth. These materials create multiple filtration layers that remove particles and improve water quality.

How long does a DIY survival water filter last?

Improvised filters typically last only a short time. The filtration materials should be replaced regularly because dirt and contaminants will clog the filter.

Is charcoal important in water filtration?

Yes. Charcoal helps absorb toxins, chemicals, and odors. It is one of the most effective natural filtration materials available in survival situations.

survival water filter layers infographic charcoal sand gravel globalsurvivalbase

Improvised water filter survival infographic charcoal sand gravel

Recommended Articles

Download Free Printable Preparedness Checklists Series :

πŸ‘‰Download Free Checklist

Designed to help individuals and families prepare with structure, clarity, and confidence.